Adding a Custom Font
This tutorial will take you through the steps needed to add a custom font to your Gantry template and make it available on the Font Settings dropdown in the template parameters.
In this example, we will explain how you can add the custom free font Bloody to your Gantry template.
Step 1: Adding Your Custom Font Files
Bloody is a free font that you can download at FontSquirrel. Please ensure you download the @font-face Kit.
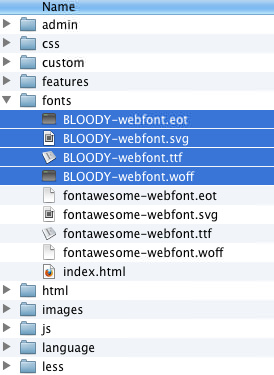
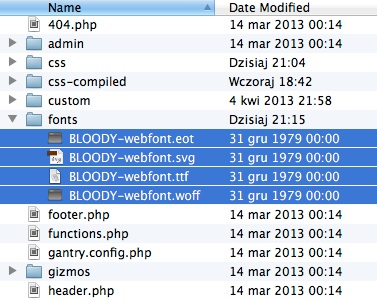
Unzip the package and move the following files to /templates/[TEMPLATE]/fonts/:
- BLOODY-webfont.eot
- BLOODY-webfont.svg
- BLOODY-webfont.ttf
- BLOODY-webfont.woff
Bloody is a free font that you can download at FontSquirrel. Make sure you've downloaded the @font-face Kit.
Unzip the package, and move the following files to /wp-content/themes/[TEMPLATE]/fonts/:
- BLOODY-webfont.eot
- BLOODY-webfont.svg
- BLOODY-webfont.ttf
- BLOODY-webfont.woff
Step 2: Adding the Necessary CSS
Create your custom stylesheet file, [TEMPLATE]-custom.css, and add it to /templates/[TEMPLATE]/css/.
Add the following to the custom CSS file:
/* Adding Font BLOODY */

@font-face {
    font-family: 'BloodyNormal';
    src: url('../fonts/BLOODY-webfont.eot');
    src: url('../fonts/BLOODY-webfont.eot?#iefix') format('embedded-opentype'),
         url('../fonts/BLOODY-webfont.woff') format('woff'),
         url('../fonts/BLOODY-webfont.ttf') format('truetype'),
         url('../fonts/BLOODY-webfont.svg#BloodyNormal') format('svg');
}

.font-family-bloody {
  font-family: 'BloodyNormal',Helvetica,Arial,sans-serif;
  font-weight: normal;
  font-style: normal;
}
Create your custom stylesheet file, [TEMPLATE]-custom.css, and add it to /wp-content/themes/[TEMPLATE]/css/.
Add the following to the custom CSS file:
/* Adding Font BLOODY */

@font-face {
    font-family: 'BloodyNormal';
    src: url('../fonts/BLOODY-webfont.eot');
    src: url('../fonts/BLOODY-webfont.eot?#iefix') format('embedded-opentype'),
         url('../fonts/BLOODY-webfont.woff') format('woff'),
         url('../fonts/BLOODY-webfont.ttf') format('truetype'),
         url('../fonts/BLOODY-webfont.svg#BloodyNormal') format('svg');
}

.font-family-bloody {
  font-family: 'BloodyNormal',Helvetica,Arial,sans-serif;
  font-weight: normal;
  font-style: normal;
}
Step 3: Adding the Info to the Font Settings Dropdown
With your text/code editor, open /templates/[TEMPLATE]/template-options.xml and add the custom font option (line 9 in the below example):
<field name='family' type='fonts' default='s:helvetica' primary='helvetica' label='FONT_FAMILY' isbodyclass='true' setbyurl='true' setinsession='true' setbysession='true' setincookie='true' setbycookie='true'>
    <option value='geneva'>Geneva</option>
    <option value='georgia'>Georgia</option>
    <option value='helvetica'>Helvetica</option>
    <option value='lucida'>Lucida</option>
    <option value='optima'>Optima</option>
    <option value='palatino'>Palatino</option>
    <option value='trebuchet'>Trebuchet</option>
    <option value='bloody'>Bloody</option>
</field>
Go to your template manager and confirm that the new font option is available.

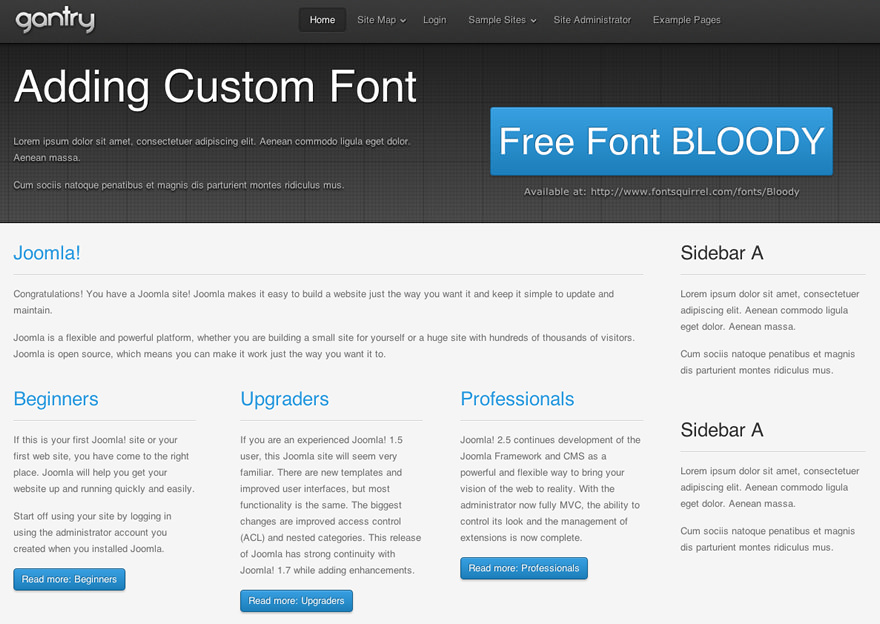
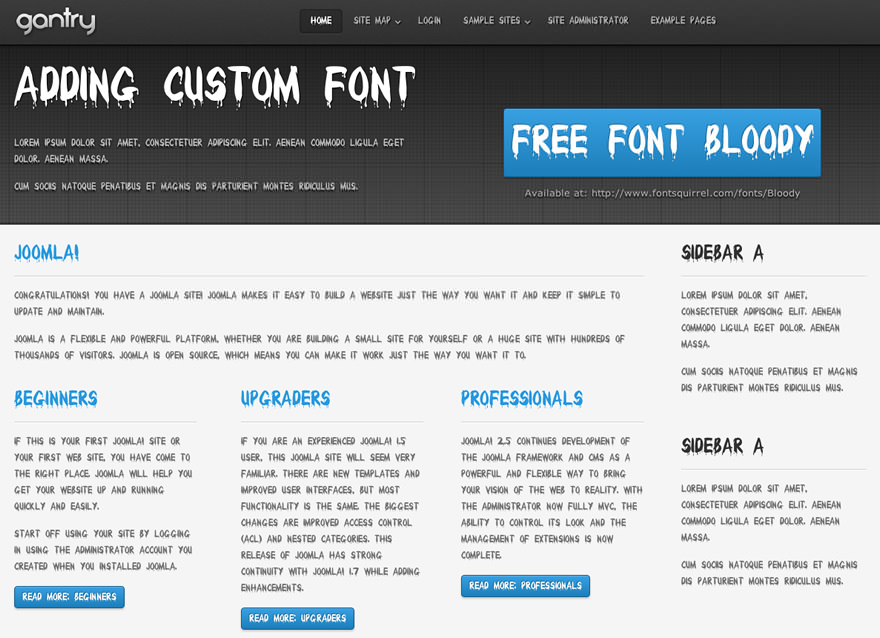
The Gantry template default font is Helvetica and the frontend will look like this:
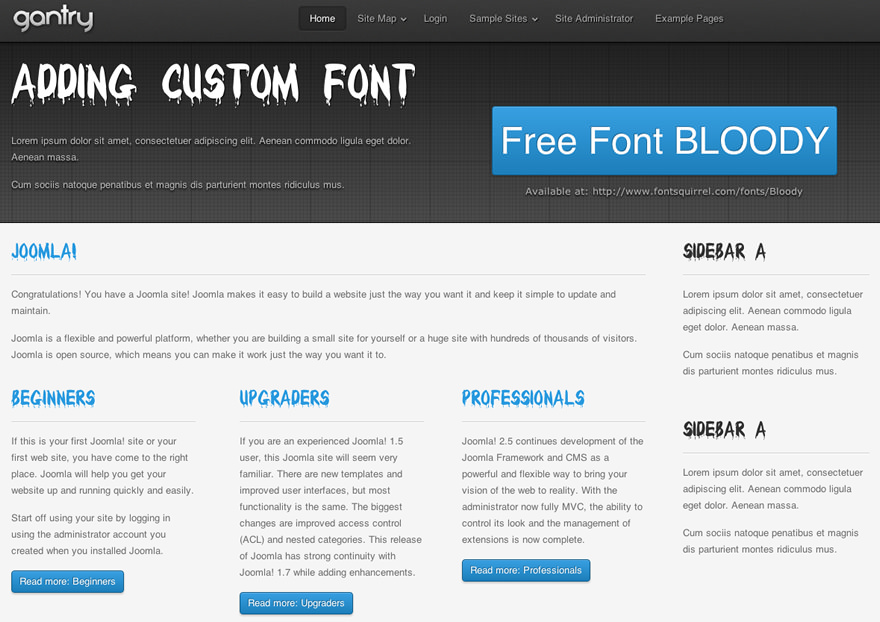
Now, set the default font to Bloody in the Font Settings parameter and reload the front end to check the result.
You can add as many custom fonts as you wish, and set the multiple option in the font settings.
With your text/code editor, open /wp-content/themes/[TEMPLATE]/templateDetails.xml, and add the custom font option (line 9 in the below example):
<field name="family" type="fonts" default="s:helvetica" primary="helvetica" label="FONT_FAMILY" isbodyclass="true" setbyurl="true" setinsession="true" setbysession="true" setincookie="true" setbycookie="true">
    <option value="geneva">Geneva</option>
    <option value="georgia">Georgia</option>
    <option value="helvetica">Helvetica</option>
    <option value="lucida">Lucida</option>
    <option value="optima">Optima</option>
    <option value="palatino">Palatino</option>
    <option value="trebuchet">Trebuchet</option>
    <option value="bloody">Bloody</option>
</field>
Now, go to your template settings, and confirm that the new font option is available.

The Gantry template default font is Helvetica. The frontend will look like the following:

Now, set the default font to Bloody in the Font Settings parameter. Reload the frontend to check the result.
You can add as many custom fonts as you wish, and set the multiple option for the font settings.
Font Usage on Specific Elements
In addition to adding the Bloody font, as outlined above, you can also add it to specific elements like component title and module title. In this example, we will add the following to the custom CSS file mentioned above:
/* Adding Font BLOODY */

@font-face {
    font-family: 'BloodyNormal';
    src: url('../fonts/BLOODY-webfont.eot');
    src: url('../fonts/BLOODY-webfont.eot?#iefix') format('embedded-opentype'),
         url('../fonts/BLOODY-webfont.woff') format('woff'),
         url('../fonts/BLOODY-webfont.ttf') format('truetype'),
         url('../fonts/BLOODY-webfont.svg#BloodyNormal') format('svg');
}

.font-family-bloody .title, .font-family-bloody .component-content h2{
  font-family: 'BloodyNormal',Helvetica,Arial,sans-serif;
  font-weight: normal;
  font-style: normal;
}
Reload the front end and check the result. Only the component title and module title will use the Bloody font. The rest of the content will use the default font Helvetica.